Open topic with navigation
Starting Check-in
If Check‐in is not already started, a shortcut should be available on the desktop of the computer. It should appear similarly to the one shown below.

The first time you launch Check‐in on a computer, you need to authenticate with Fellowship One. This procedure needs to be performed one time only. Authentication is the process of ensuring that Check‐in can access activities and people data. Once authenticated, the only time you ever need to authenticate again will be if you re‐install the application.
Authentication requires you to have a Fellowship One user name and password. No special security rights are required for this account.
Note: Some churches choose to create user accounts specifically for Check‐in stations. The user name can be something generic like “Checkin”. This practice allows you to have a user account with no security access rights in Fellowship One.
To launch Check‐in and authenticate
- Locate the Check‐in shortcut icon on the desktop of your computer. Touch the shortcut icon quickly two times (or use the mouse to double‐click the shortcut if there is a mouse attached to the computer).
- Check‐in will start and launch the automatic updater. If an update is found, it is downloaded and installed automatically. The Authenticate Church screen appears with fields that allow you to enter the proper credentials to access Check‐in.
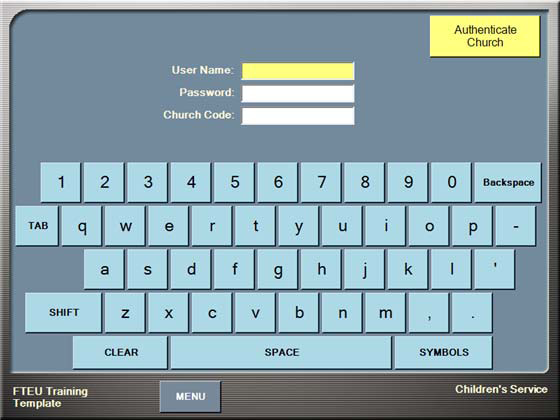
- Use the touchscreen to enter your User Name, Password and Church Code. Touch
the TAB button to move from field to field.
Note: Passwords require you to touch the SYMBOLS button to access special characters.
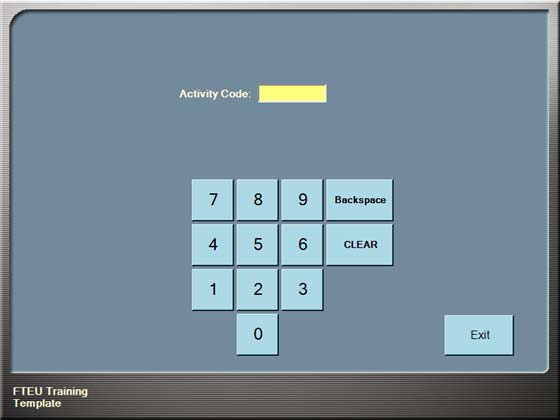
- Touch Authenticate Church. If the information you entered is correct, the Activity
Code screen appears. If any of the information is incorrect Check‐in displays an error
message. Correct any errors and try again. See Activity and Super Check-in Codes for details on locating activity and Super Check-in codes.
- Enter the activity or Super Check-in code by touching the number pad. When the final number is entered, the Check-in type selection screen appears.
- Select the mode of Check-in to use (see Check-in Mode Selection for complete descriptions):
- Assisted—this type of Check-in is meant to be used by a volunteer who will be greeting and assisting participants and new visitors.
- Self—this type of Check-in is meant to be used by frequent attendees who have a barcode number assigned.
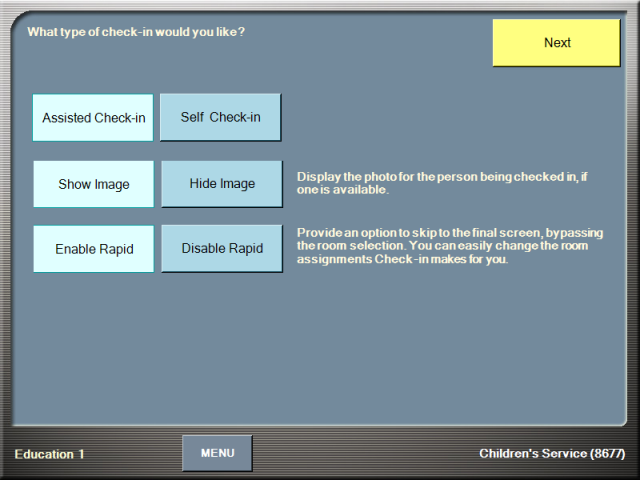
- Touch Next. Check-in is ready to use.